As stated in our “Style guide – Colors documentation Page”, ACSS Tokens automatically generates eight main color families:
- Primary color
- Secondary color
- Action color
- Base color
- Accent color
- Shade color
- Contextual colors
- B&W colors
In addition to the main color palettes, ACSS Tokens automatically generates a wide range of color tones based on the main color shade you select.
You can preview every color token on the Style guide > Colors page.
How to search for ACSS Color Tokens?
To locate the ACSS Color token of your choice, simply search by a color family name.
For example, if you would like to apply any of the ACSS Action color tokens, simply type “Action” in a search input field.
All available shades for the action color family will be available for you to use.

How to apply ACSS Color tokens?
To apply ACSS Color tokens in your design file, follow these guidelines:
- To apply a specific ACSS Color token as a background color (referred to as “Fill” in Figma), left-click the token. Left-clicking a color token will automatically apply its color as a background color.
- To apply an ACSS Color token as a stroke (border color), right-click the token and select “Border.”
How to remove applied ACSS Color token?
To remove an applied color token as a background color, simply left-click it once again. This action will “deselect” the applied color token.
To remove the applied color token as a border (stroke) color, right-click the token and deselect “Border” by left-clicking it.
How to change ACSS Color Tokens to a different color?
If you wish to change the color shade for a specific ACSS Color family token, follow these instructions:
- In the Tokens Studio plugin’s search input, type the color family name, e.g., “Action.”
- Under the “Other” tab, you will find “Color settings” for that specific color family. These settings include three symbols: “H” (Hue), “S” (Saturation), and “L” (Lightness).

- You can change any value you want, but if you want to change the color shade to a different one, you want to target mainly the Hue “H” value.
- You can right click the “H” symbol and choose “Edit token”. Additionally, shortcut for editing token’s value is to press Command (Mac) or Control (Windows) keys on your keyboard while left-clicking it with your mouse.
- Under the “Other” input field, you will see a value. In our case, we want to change a value from 358 to something else. You can choose any value from 0-360. We will choose 150 in our example.

- Then, click on the “Save” button at the bottom of the page.
- Color tokens are changed. Now the last step is to apply that change to our design file. You can do this by clicking a blue button in the Tokens Studio plugin at the bottom right corner. You can choose to apply that change only to a certain element, page or a whole document. We have presented those options in more detail in our “Tokens Studio plugin overview” documentation page.


How to add a custom ACSS Color Token?
It is possible to add your own custom color token if you would like to.
Please proceed like this:
- In the Tokens Studio plugin, search for a color family you would like to add your custom color token to.
- In our example, we want to add a new Action Color shade called “Medium-Dark”
- Before we create an actual color token, we need to first create a custom “Lightness adjustment” value
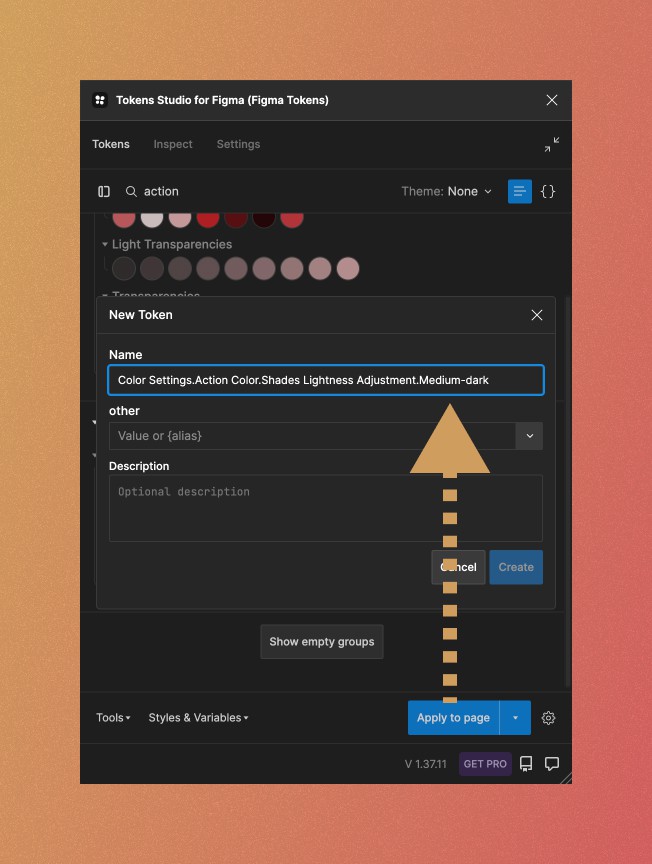
You can locate the settings for “Lightness adjustment” value like in the image below.- Hover over that setting and click on the “+” icon on the right.
- A dialog menu will appear. First, we will need to name our new “Lightness adjustment” value. We can do that in the “Name” input field. Notice that Tokens Studio plugin already pre-filled that input with a path. In our example, it is “Color Settings.Action Color.Shades Lightness Adjustment.”. We want to start typing our new custom color adjustment value name after the dot. So, we can type “Medium-dark”.

- Next, we will want to select the full name and copy it to our clipboard. It is very important because we will need to reference this token in the later steps.
- Then, we will need to input the lightness value for that setting. It has to be a number from 0-100 with a % symbol at the end. In our case, it should be something between Medium lightness adjustment value and Dark lightness adjustment value. So, something between 50% to 25%. We will choose 35%. Since we are talking about lightness, the lower the number we input, the darker the color shade will be.
For your reference, here are the Lightness adjustments values for all the ACSS Color tokens:
Ultra-light = 95%
Light = 85%
Medium = 50%
Dark = 25%
Ultra-dark = 10%
Hover = Hover lightness adjustment value is calculated as 0.85 times the lightness of the main color shade’s lightness value. - After that, click the “Create” blue button at the bottom right corner.
- Now we are ready to create our custom color shade.
- As with our lightness adjustment values, you will see that, while hovering on the action color shades, there is a plus icon on the right side. When you hover over that icon, a tooltip will appear “Add a new token”. Click on it.
- A dialog menu will appear. First, we want to add a name for our custom color token. Notice, Tokens Studio plugin already pre-fills that input field with “Action.Shades.”. We want to leave that value there and start typing after the last dot.
- We will type “Medium-dark”
- Next, in the color field, you want to input your color. It accepts the Hex code, RGB and HSL values. You can certainly add whatever color you want, but we would highly recommend to “hook” into ACSS Tokens color settings. Doing this will automatically change that color when you change the Hue value for your main color shade.
- So to hook into ACSS Color Tokens, we want to input the following syntax:
hsl({Color Settings.Action Color.Shade.H},
{Color Settings.Action Color.Shade.S},
{Color Settings.Action Color.Shades Lightness Adjustment.Medium-dark})
Notice how we referenced our custom Lightness adjustment value we created? That is why we needed to copy that token name before. - Now, the last thing we want to do is to provide a name for our new custom color token. We can do this by typing “Medium Dark” in a description field.

- Then, you are all set. We just need to click the blue button at the bottom right corner “Create/Save”.


How to add a custom color token to a Style guide – color page?
To add your newly created color token to a style guide, please do the following.
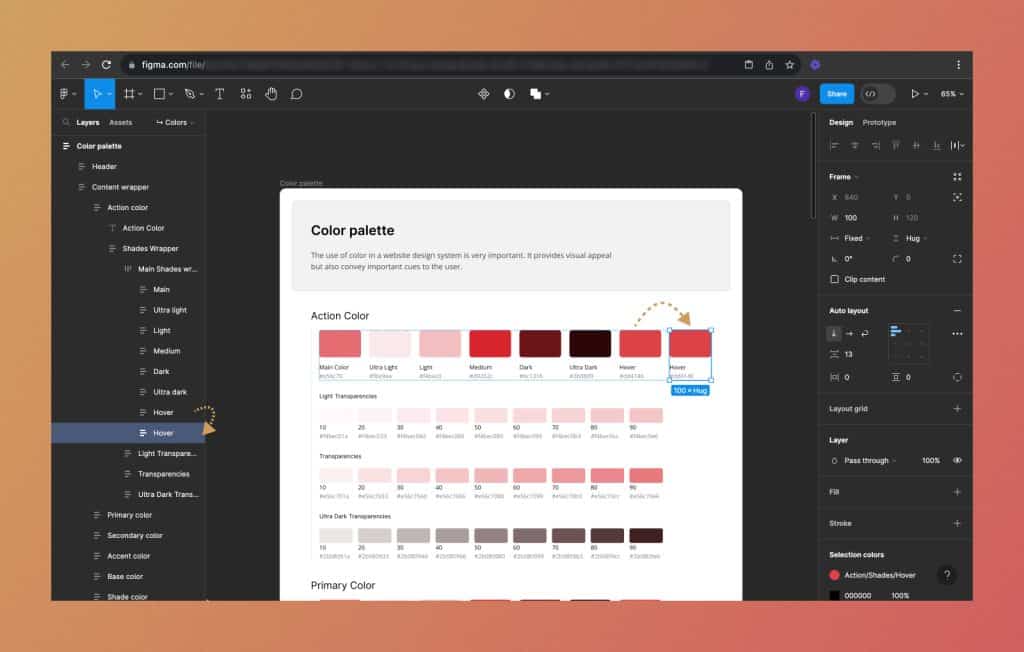
In your Figma structure pane, locate the Style guide – colors page.

Next, locate the color family you added your custom color token in.
In our example, we will locate an action color shade family.
Press Command (Mac) or Control (Windows) key on your keyboard and left click the last rectangle that represents the color token “Hover”.
This will select the rectangle itself, but we want to select the parent layer.

To do that, press Shift+Enter on your keyboard. Additionally, you can click on the parent layer called “Hover” in the Figma structure pane.

On your keyboard, press the keyboard shortcut Command + D (Mac) or Control + D (Windows), which will duplicate that layer one more time.
After duplicating the layer, we want to rename that layer first. You can do that by right-clicking the layer and choosing “Rename”. Alternatively, you can press a keyboard shortcut Command + R (Mac) or Control + R (Windows). Rename it to whatever you like. In our example, we will rename it to “Medium Dark”.
Next, we want to apply our custom color token color and values.
Click on the rectangle representing the color and in your Tokens Studio plugin, left-click the newly created custom color token. This will apply that color token’s color as a background color.
Next, left-click on the name text layer under the rectangle. Now, right click your custom color token and under “Documentation token” dropdown select “Description”. This will apply whatever value you set in a description input field during the custom color token creation.

Lastly, left-click on the hex code value text layer under the color token name. From your “Documentation token” dropdown menu choose “Value”.

That’s it 🙂
How to add a gradient color token?
To add a gradient color token, please follow these steps:
- Locate the color family you want to create your gradient color token in (for example Action color family).
- Add a new token by clicking on a “+” icon
- Give it a name, for example “Custom-gradient”
- In a color input field, we can write the CSS-like syntax. Like this:
linear-gradient(90deg, white 0%, black 100%)
The above code will create a color gradient like in the image below. (
- It is also possible to reference your ACSS Color tokens. For example, you can do something like this:
linear-gradient(90deg, {Action.Shades.Action} 0%, {Action.Shades.Ultra-Dark} 100%) - In the description input field, you want to provide a name for that Gradient color token that will be displayed in a Style guide
- To add this custom gradient token to your style guide, please follow the steps we have outlined above in the “How to add a custom color token to a Style guide – color page?” section


How can I find the HSL values of the color that I like?
Let’s say you have a logo image with a special purple color applied. But you don’t know the HSL Values of that color.
It is very easy to do in Figma.
All you have to do is to upload that logo image in your Figma design file. You can do that by pressing a keyboard shortcut Shift + Command + K (Mac) or Shift + Control + K (Windows).
Next create a basic rectangle shape on your Figma design canvas. You can find the rectangular shape tool in the Figma utility bar located at the top. Or you can press a keyboard shortcut “R”.
Draw a simple rectangle.
Then, in a Figma design panel, inside a fill layer section click on a small rectangle indicating a fill color.

A contextual menu will appear. Click on the “Color Picker tool” like on the image below.

With a color picker tool selected, hover over the logo that you like and simply left-click on a part with a color you want to translate to HSL.
This will apply that color as a fill color to your rectangle tool.
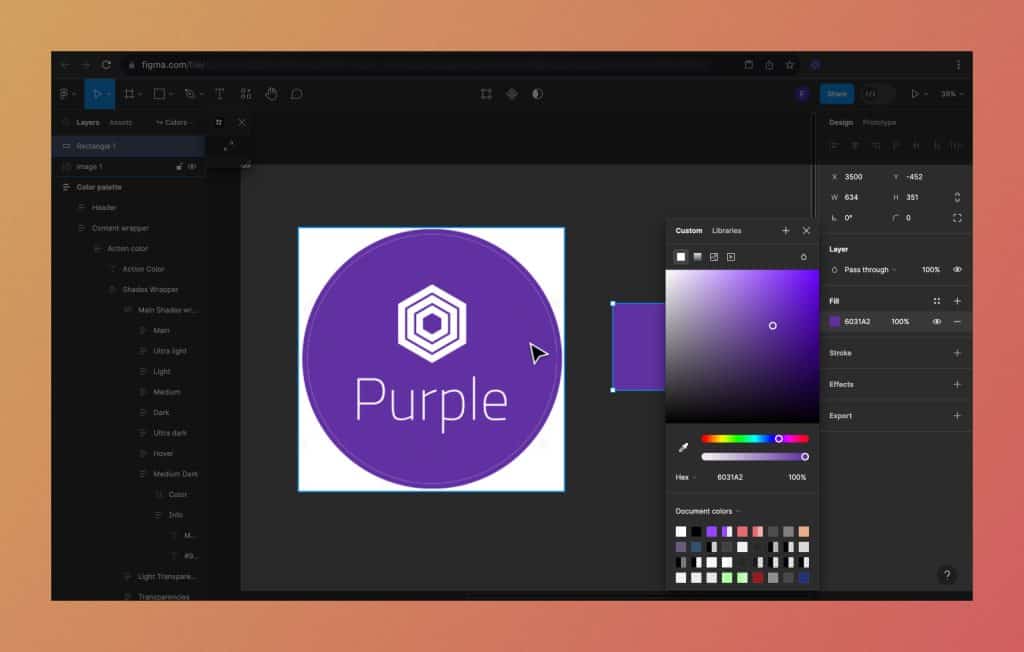
Then you just need to change the “HEX” to “HSL” like in the image below.

This way, you can precisely target the HSL values of any color from any image.
Then, you can map those HSL values to ACSS Color tokens by adjusting H(Hue), S(Saturation) and L(Lightness) values.
